根据前一节构建的框架,本节搭建一个基本的前端页面UI,大体上需要如下四个页面:
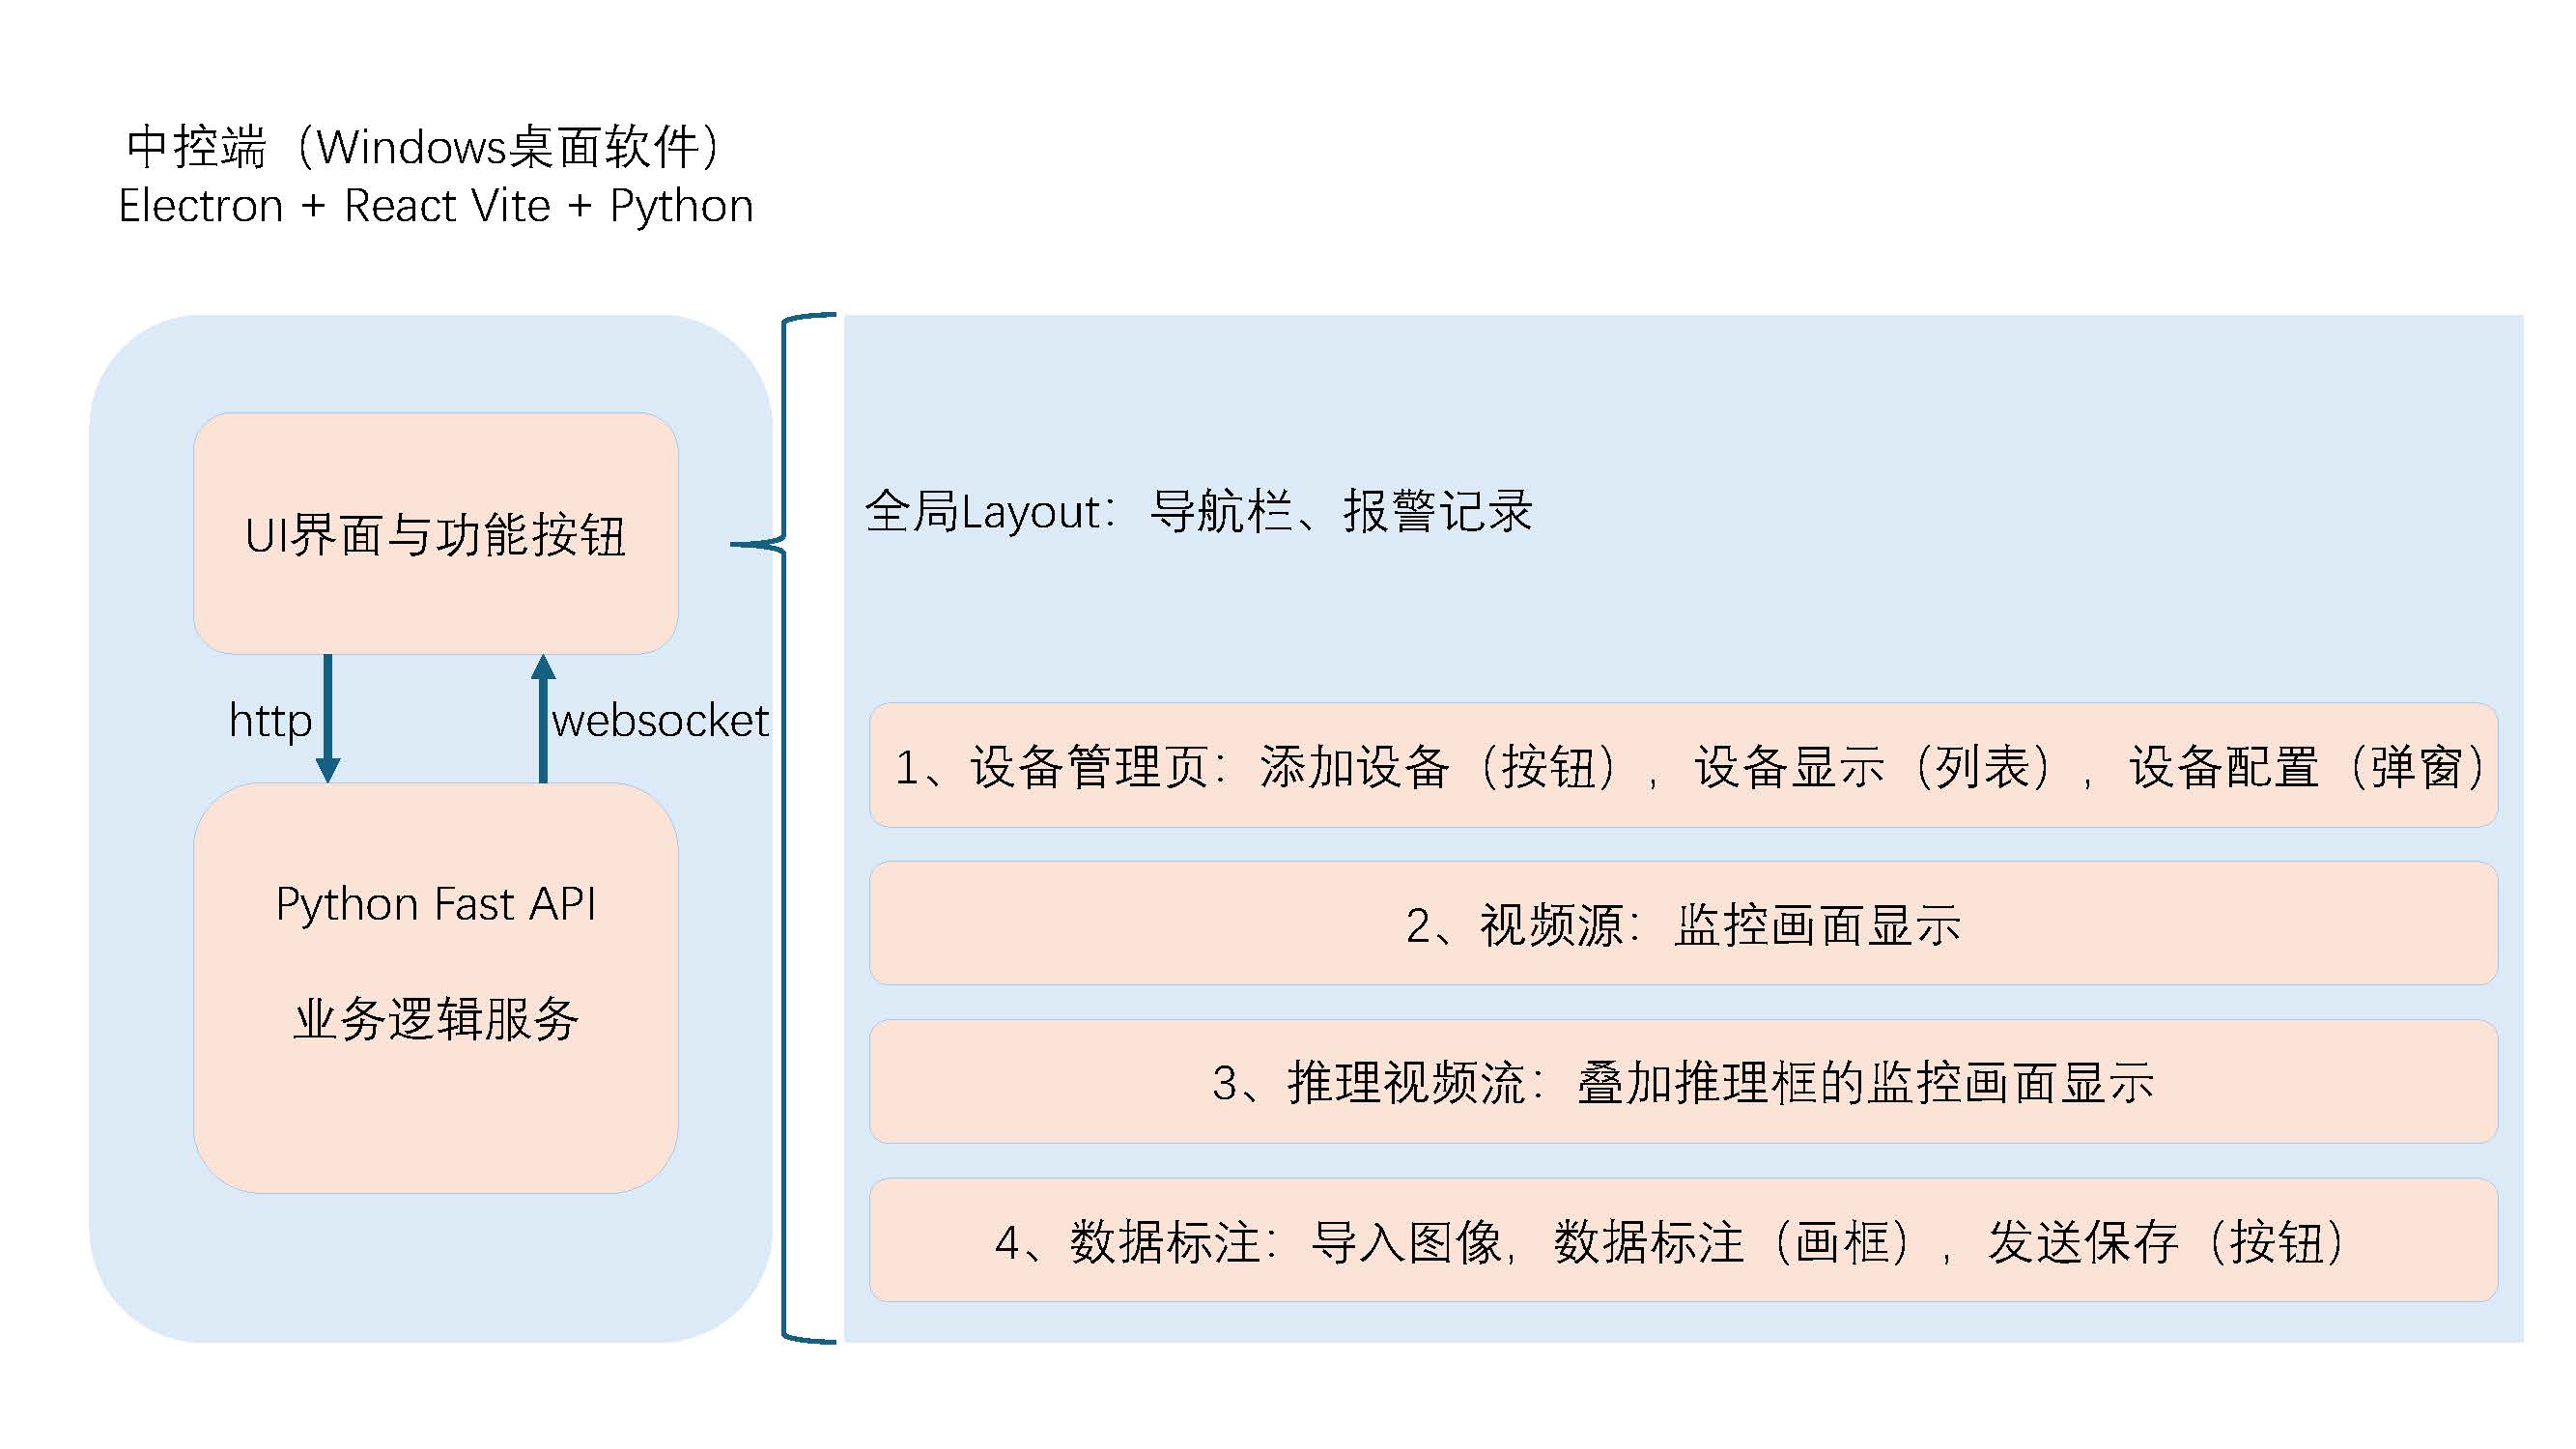
全局layout
核心架构搭建:构建基于 Ant Design 的响应式全局 Layout
在后台管理系统中,全局 Layout(布局)扮演着骨架的角色。它不仅负责维护页面结构的一致性(侧边栏、顶栏),还需要处理全局状态(如导航高亮、报警消息推送)。
采用了 React + Ant Design 5.x + Tailwind CSS,构建了一个经典的“左右结构”管理后台。以下是该组件的三个核心实现要点:
利用 Flex 布局与组件化
利用 Ant Design 的 组件体系,极大地简化了 CSS 布局的工作量。整体采用了 Sider(侧边栏)+ Header(顶栏)+ Content(内容区)的经典布局。
Sider: 负责导航,支持折叠收起。Header: 放置折叠开关和全局功能入口(如消息通知)。Content: 路由的出口,用于渲染具体的业务页面。
代码实现上,通过Tailwind的 min-h-screen 确保布局始终占满视口高度,避免页面内容过少时底部留白:
jsx1
2
3
4
5
6
7
8
9
10
11
12
13
14
15
16
17
18
19
20
21
22
23
| import { Layout, Menu, Badge, Drawer, List, Typography, Button, Empty } from 'antd';
const { Header, Sider, Content } = Layout;
<Layout className="min-h-screen">
<Sider collapsible collapsed={collapsed} theme="dark">
{/* 左侧菜单区域 */}
<Menu
items={menuItems}
onClick={({ key }) => navigate(key)}
/>
</Sider>
<Layout>
<Header className="bg-white px-4 flex justify-between shadow-sm">
{/* 顶部工具栏:折叠按钮 + 消息通知 */}
</Header>
<Content className="bg-gray-100 overflow-auto">
{children} {/* 路由页面渲染位置 */}
</Content>
</Layout>
</Layout>
|
需要单独说一下Tailwind,传统上我们需要给一个div或者其他组件起一个类名,然后在CSS文件中引用类名写一大堆样式,而Tailwind可以直接用一些“积木”直接应用样式。
路由与菜单的双向绑定
为了保证用户刷新页面后,侧边栏的高亮状态不丢失,我们将 React Router 的 useLocation 与 AntD Menu 的 selectedKeys 进行了绑定。
jsx1
2
3
4
5
6
7
8
9
10
11
12
13
14
15
16
| const location = useLocation();
const navigate = useNavigate();
const menuItems = [
{ key: '/devices', icon: <DesktopOutlined />, label: '设备管理' },
{ key: '/monitor', icon: <VideoCameraOutlined />, label: '视频监控' },
];
<Menu
mode="inline"
selectedKeys={[location.pathname]} // 关键:根据当前 URL 自动高亮
items={menuItems}
onClick={({ key }) => navigate(key)}
/>
|
报警消息抽屉
将“报警通知”功能集成在了全局 Header 中。利用 Zustand 管理全局状态,配合 AntD 的 Drawer 和 Badge 组件,实现了一个可随时呼出的通知中心。
我们通过自定义函数 getAlarmColor,根据报警级别(Critical/Warning)动态渲染边框颜色,并通过背景色区分“已读/未读”状态,大大提升了信息的识别效率。
jsx1
2
3
4
5
6
7
8
9
10
11
12
13
14
15
16
17
18
19
20
|
const getAlarmColor = (level: string) => {
switch (level) {
case 'critical': return '#ff4d4f';
case 'warning': return '#faad14';
default: return '#1890ff';
}
};
<List.Item
style={{
// 未确认消息显示淡黄色背景,强调提醒
background: alarm.acknowledged ? undefined : '#fff7e6',
border: `1px solid ${getAlarmColor(alarm.level)}`
}}
>
{/* 报警详情展示 */}
</List.Item>
|

其他页面我不想写了,因为都差不多(●’◡’●)
回想一下我们的核心目的:添加连接设备 + 通过http控制端侧 + 接收展示端侧发来的websocket的消息。
后续主要唠一唠关于后两个核心点的实现。
针对端侧http控制
与端侧(AI Box)联系的核心就是一些API,但是稍微有一点区别。常见的一些web网页里面,我们会直接请求后端(AI Box),但是当前这个项目其实是有两个后端,一个软件的业务逻辑端,一个是端侧设备的web服务,按理说我们应该去直接访问(AI Box),但细细想来,我们可能还要对端侧返回的信息做一定的处理,所以,我的打算是:
1
| 客户端软件UI中的请求 --> 客户端软件业务逻辑的FastAPI --> HTTPX转发到端侧(AI Box)
|
通过一个典型场景来描述这一过程:为端侧设备配置新的高危类别:
前端发起请求:
1
2
3
4
5
6
7
8
9
10
11
12
13
14
15
16
| // 提交高危类别更新
const handleUpdateLabels = async (values: any) => {
if (!selectedDevice) return;
try {
// 这里的 values.labels 已经是字符串数组了
await updateDangerousLabels(selectedDevice.id, values.labels);
message.success('高危类别配置已更新');
setSettingModalVisible(false);
} catch (error) {
message.error('更新配置失败');
}
};
// 更新高危类别
async updateDangerousLabels(deviceId: string, labels: string[]): Promise<void> {
return api.post(`/api/devices/${deviceId}/dangerous-labels`, labels);
},
|
前端软件的业务后端:
业务后端
1
2
3
4
5
6
7
8
9
10
11
12
13
14
15
16
17
18
19
20
| @router.post("/{device_id}/dangerous-labels")
async def update_dangerous_labels(
device_id: str,
labels: List[str],
device_manager: DeviceManager = Depends(get_device_manager)
):
"""更新高危类别"""
device = device_manager.get_device(device_id)
if not device:
raise HTTPException(status_code=404, detail="设备不存在")
device.dangerous_labels = labels
edge_client = EdgeClient(device)
await edge_client.update_dangerous_labels(labels)
await device_manager.save_devices()
return {"message": "高危类别已更新", "dangerous_labels": labels}
|
业务后端需要联系实际干活的端侧,因此需要通过HTTP请求把label转发过去:
1
2
3
4
5
| async def update_dangerous_labels(self, labels: List[str]) -> Dict[str, Any]:
"""更新高危类别"""
return await self._request("POST", "/api/inference/dangerous-classes", json={
"classes": labels
})
|
端侧
端侧运行了一个nodejs的web服务器,用来接受处理上面的请求:
1
2
3
4
5
6
7
8
9
10
11
12
13
14
15
16
17
18
19
20
21
22
23
24
25
26
27
28
29
30
31
32
33
34
35
|
router.post('/dangerous-classes', async (req, res) => {
const { inferenceEngine } = req.app.locals;
try {
const { classes } = req.body;
if (!Array.isArray(classes)) {
return res.status(400).json({
success: false,
error: 'Classes must be an array'
});
}
await inferenceEngine.setDangerousClasses(classes);
res.json({
success: true,
message: 'Dangerous classes updated',
data: { classes }
});
logger.info('Dangerous classes updated', { classes });
} catch (error) {
logger.error('Set dangerous classes error:', error);
res.status(500).json({
success: false,
error: error.message
});
}
});
|
端侧服务器通过zeroMQ向C++服务发送信息:
1
2
3
4
5
6
| async setDangerousClasses(classes) {
this.config.dangerousClasses = classes;
if (this.connected && this.inferenceStatus.running) {
return this.sendRequest('UPDATE_CONFIG', { dangerousClasses: classes });
}
}
|
在C++侧,提供对应CommandHandler去处理请求:
1
2
3
4
5
6
7
8
9
10
11
12
13
14
15
16
17
18
19
20
21
22
23
24
25
26
27
28
29
30
31
| json CommandHandler::handleCommand(const std::string& command, const json& params) {
std::cout << "[CommandHandler] Handling: " << command << std::endl;
if (command == "PING") {
return handlePing(params);
} else if(command == "GET_STATUS") {
return handleGetStatus(params);
} else if (command == "INIT_ENGINE") {
return handleInitEngine(params);
} else if (command == "INIT_MODEL") {
return handleInitModel(params);
} else if (command == "START_INFERENCE") {
return handleStartInference(params);
} else if (command == "START_INFERENCE_CAMERA") {
return handleStartInferenceCamera(params);
} else if (command == "STOP_INFERENCE") {
return handleStopInference(params);
} else if (command == "STOP_INFERENCE_CAMERA") {
return handleStopInferenceCamera(params);
} else if (command == "ADD_CAMERA") {
return handleAddCamera(params);
} else if (command == "REMOVE_CAMERA") {
return handleRemoveCamera(params);
} else if (command == "UPDATE_CONFIG") {
return handleUpdateConfig(params);
}
json response;
response["success"] = false;
response["error"] = "Unknown command: " + command;
return response;
}
|
然后C++调用对应的函数,实现功能。
由端侧传递的报警信息
上节展示了从中控到端侧的信息传递,本节来顺一下检测到的报警信息如何传递给中控,
1
| C++ 推理标签核对出高危标签 --> 发布zeroMQ消息 --> nodejs端侧服务器接收并转发消息 --> 中控业务后端接收消息 --> 中控前端显示消息
|
C++ 核对高危标签并上报
在往画面上绘制推理结果的同时,我们针对每一个标签进行判断,是不是高危类型,然后调用zeroMQ发布信息的函数,向接口发送信息。
1
2
3
4
5
6
7
8
9
10
11
12
13
14
15
16
17
18
19
20
21
22
23
24
25
26
27
28
29
30
31
32
| void InferenceWorker::drawDetections{
for (const auto& det : detections) {
if (config_.dangerousClassIds.contains(det.class_id)) {
publishResult(stream_id, det);
}
}
}
void InferenceWorker::publishResult(const std::string& stream_id, const Detection& det) const {
json detJson;
detJson["type"] = "ALARM";
detJson["data"]["camera_id"] = stream->id;
detJson["data"]["camera_name"] = stream->name;
detJson["data"]["bbox"] = {det.x1, det.y1, det.x2, det.y2};
detJson["data"]["confidence"] = det.confidence;
detJson["data"]["label"] = getLabel(det.class_id);
server_->publish(detJson.dump());
}
void ZmqServer::publish(const std::string& message) {
std::lock_guard lock(pubMutex_);
try {
zmq::message_t msg(message.data(), message.size());
pubSocket_.send(msg, zmq::send_flags::dontwait);
} catch (const zmq::error_t& e) {
std::cerr << "[ZmqServer] Publish error: " << e.what() << std::endl;
}
}
|
nodejs向中控发送信息
我们需要明确一点:nodejs的端侧web服务器干的活挺多的,要被动等待中控的请求,要主动向中控发起websocket的连接请求,又要通过zeroMQ去监听C++的报警信息,那么他在初始化的时候,可以如下尝试:
1
2
3
4
5
6
7
8
9
10
11
12
13
14
15
16
17
18
19
20
21
22
23
24
25
|
async initializeServices() {
// WebSocket服务
this.wsService = new WebSocketService(config.get('websocket.port'));
await this.wsService.start();
// 流媒体管理器
this.streamManager = new StreamManager(config.get('stream'));
// C++推理引擎连接
this.inferenceEngine = new InferenceEngine(config.get('cppEngine'));
this.cloudClient = new CloudClient(this.inferenceEngine);
this.cloudClient.connect();
// 将服务注入到app中,供路由使用
this.app.locals.wsService = this.wsService;
this.app.locals.inferenceEngine = this.inferenceEngine;
this.app.locals.streamManager = this.streamManager;
this.app.locals.cloudClient = this.cloudClient;
logger.info('All services initialized');
}
|
将C++ 的连接作为参数,传递给中控的websocket连接,通过类似于回调的方法,去实现消息的转发,具体来说,在this.inferenceEngine中定义了zeroMQ的各个事件,其中包括如何处理接收到的报警信息。
1
2
3
4
5
6
7
| // 接收到消息
handleAlert(data) {
this.emit('ALARM', data);
if (this.alertCallback) {
this.alertCallback(data);
}
}
|
在连接中控的类中,通过传参的方式将消息传递给另一个连接,进而再次转发给中控进行处理。
1
2
3
4
5
6
7
8
9
10
11
12
13
14
15
16
17
18
19
20
21
22
23
24
| class CloudClient {
constructor(inferenceEngine) {
this.ws = null;
this.inferenceEngine = inferenceEngine;
this.reconnectTimer = null;
this.isIntentionalClose = false;
// 从 config 中读取配置
const baseUrl = config.get('masterController.baseUrl'); // 例如 ws://192.168.1.100:8000/ws/edge/
const deviceId = config.get('masterController.deviceId'); // 例如 device_001
// 拼接 URL
this.url = `${baseUrl.endsWith('/') ? baseUrl : baseUrl + '/'}${deviceId}`;
this.reconnectInterval = config.get('masterController.reconnectInterval') || 5000;
// 绑定推理引擎的事件,自动上报
if (this.inferenceEngine) {
this.inferenceEngine.on('ALARM', (data) => {
this.sendAlarm(data);
});
}
}
}
|
中控
仔细来看,所有的消息接收处理调用的方法都高度相似,在python中也是如此:
1
2
3
4
5
6
7
8
9
10
11
12
13
14
| async def handle_edge_message(self, device_id: str, data: dict):
"""处理端侧设备消息"""
message_type = data.get("type")
if message_type == "alarm":
# 处理报警消息
await self._handle_alarm(device_id, data)
elif message_type == "training_progress":
# 训练进度更新
await self.broadcast_to_device(device_id, {
"type": "training_progress",
**data
})
|